In my recent project I was asked to get site collection inventory between various enviornments. Requirement was to get a automated file with certain information of each site. Information that was needed for each site is as below.
Name
Title
Description
Theme
WebTemplate
Author
Created
Modified
Sites
Users
ParentWeb
Url
ServerRelativeUrl
ID
Requirement seemed to be simple but there was no easy answer who what my soluton would be.
Initially when I started to think of a solution various few things that came to my mind including copy and paste through Content and Structure under sitecollection settings, wirting object model code and then it clicked with check what powershell has to offer.
Using power shell I wrote useful script to get all the required information for each site and exported it to a .csv file. Following is the script where $url should be replaced with the actual site collection.
$Path = $pwd.ToString() + "\SiteInformation.csv"
$SiteInfo = Get-SiteInformation $Url $SiteInfo Export-Csv $Path -NoTypeInformation
function Get-SiteInformation ([string]$Url) {
$SPSite = New-Object Microsoft.SharePoint.SPSite($Url) $AllWebs = $SPSite.AllWebs
$AllWebs ForEach {
if ($_.Theme -eq "")
{ $Theme = "Default Theme" }
else
{ $Theme = $_.Theme }
$SiteInformation = New-Object PsObject
$SiteInformation Add-Member -memberType NoteProperty "Name" -Value $_.Name $SiteInformation Add-Member -memberType NoteProperty "Title" -Value $_.Title $SiteInformation Add-Member -memberType NoteProperty "Description" -Value $_.Description $SiteInformation Add-Member -memberType NoteProperty "Theme" -Value $Theme $SiteInformation Add-Member -memberType NoteProperty "WebTemplate" -Value $_.WebTemplate $SiteInformation Add-Member -memberType NoteProperty "Author" -Value $_.Author $SiteInformation Add-Member -memberType NoteProperty "Created" -Value $_.Created $SiteInformation Add-Member -memberType NoteProperty "Modified" -Value $_.LastItemModifiedDate $SiteInformation Add-Member -memberType NoteProperty "Sites" -Value ($_.Webs).Count $SiteInformation Add-Member -memberType NoteProperty "Users" -Value $_.SiteUsers.Count $SiteInformation Add-Member -memberType NoteProperty "ParentWeb" -Value $_.ParentWeb $SiteInformation Add-Member -memberType NoteProperty "Url" -Value $_.Url $SiteInformation Add-Member -memberType NoteProperty "ServerRelativeUrl" -Value $_.ServerRelativeUrl $SiteInformation Add-Member -memberType NoteProperty "ID" -Value $_.ID
$SiteInformation }}
I am excited to expose more about PowerShell and the useful features it brings to the Sharepoint as an platform so keep looking for furture posts. Thanks !
Wednesday, April 29, 2009
Tuesday, April 7, 2009
Page Sizes and Browser Preview in SharePoint Designer
One of the most frustrating things about designing for the Web is the wide array of browsers and screen formats in which your site may be displayed. SharePoint Designer helps mitigate this problem by giving you several preview options.
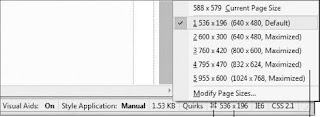
First, you can fix the Design view to a set of dimensions. In the status bar, you can see the current dimensions of the window the Design view represents. Click the dimensions entry to see the menu shown in Figure 1-11, which allows you to choose from several page sizes.
First, you can fix the Design view to a set of dimensions. In the status bar, you can see the current dimensions of the window the Design view represents. Click the dimensions entry to see the menu shown in Figure 1-11, which allows you to choose from several page sizes.

Figure 1-11
If the selected dimensions are smaller than the current design window, the width of the working area is reduced to the horizontal dimension selected. The chosen vertical dimension is shown by a dotted line across the visible area of the page.
If the selected dimensions are larger than the current design window, the workspace is expanded horizontally, and the scroll bar at the bottom of the window is activated.
Note: The default page sizes represent Microsoft Internet Explorer in its default configuration. You can create your own set of dimensions to choose from.
When a fixed page size is selected, the dimension status shows the hash symbol seen in Figure 1-11. The Page Size menu is also available under the View menu.
Design view provides a close approximation of the rendering of your page, especially with the visual aids turned off. However, even with the fixed page size option, SharePoint Designer cannot perfectly reproduce the environment of a web browser. To resolve this, SharePoint Designer provides the option to preview your page directly in web browsers.
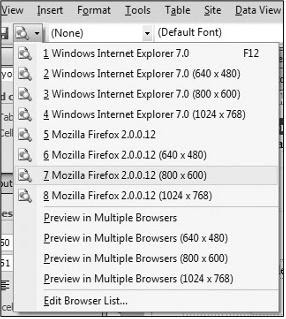
Not only can a page be rendered differently in a browser than within SharePoint Designer, but different browsers and even different versions of the same browser have their own ways of rendering pages. It is best practice, therefore, to test your pages in each of the browsers you expect to view your site. SharePoint Designer’s Preview in Browser function enables you to select an exact environment in which to test your pages. Figure 1-12 shows the Preview in Browser menu as selected from the icon in the Common toolbar.

Figure 1-12
Internet Explorer and Mozilla Firefox are automatically detected by SharePoint Designer if they are installed on your workstation. In addition, you can select any other installed browser for live preview. Follow these steps to add another browser to the preview list:
1. Select Preview in Browser@@>Edit Browser List. The Edit Browser List dialog box appears, as shown in Figure 1-13.

Figure 1-13
2. Click the Add button. The Add Browser dialog box appears (see Figure 1-14).
Figure 1-14
3. Type a name to represent the browser.
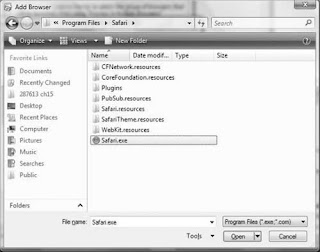
4. Click the Browse button to open the Add Browser window (see Figure 1-15), and navigate to the .exe file that starts the application. (You may need to look at the properties of the application’s launch icon to find the file location.)
3. Type a name to represent the browser.
4. Click the Browse button to open the Add Browser window (see Figure 1-15), and navigate to the .exe file that starts the application. (You may need to look at the properties of the application’s launch icon to find the file location.)
Figure 1-15
5. Click Open, and then click OK on the other two dialogs.
5. Click Open, and then click OK on the other two dialogs.
Monday, April 6, 2009
Microsoft® Commerce Server 2009 is Now Available on MSDN!
Over on the e-commerce blog (owned by the Commerce Server team), they announced the availability of Commerce Server 2009 on MSDN. Excellent!
So why is this so relevant to the SharePoint audience?
So why is this so relevant to the SharePoint audience?
Commerce Server 2009 delivers an out-of-the-box shopping site that leverages SharePoint Commerce Services which provides a gallery of 35 web parts and controls that can be assembled within SharePoint.
Here’s a list of some of the functionality provided by SharePoint Commerce Services:
· Virtual Earth Store Locator, which integrates with Virtual Earth mapping software so that shopping sites have detailed maps of store locations.
· Attract a larger consumer base by using Live™ ID, allowing single sign-on to your shopping site.
· Search that searches both the e-commerce site and static content seamlessly.
· Display reviews and ratings for individual products, and ability for shoppers to submit their own reviews and ratings, with administrative workflow for management discretion.
· Display advertisements and discounts that are relevant to both the current shopper and current site context, and that work in conjunction with Marketing Manager and campaigns.
· Shoppers and managers can take advantage of Profile Administration features, including the ability to add and edit addresses, view and launch credit card information, a registration wizard, and the ability to reset passwords.
Saturday, April 4, 2009
Change Item Order Menu
One of the benefits of the Links list type is that it comes with the ability to reorder the items in the list via a nice UI, as seen here:
One of the things that I notice is that this menu item only shows up for the "All Links" view. So, even if you have another view in the List, just navigate to the All Links view and the menu item will be available.
Friday, April 3, 2009
Understanding how SharePoint works : Customized vs Uncustomized Files
For developers getting into the world of SharePoint development, it can be daunting at first. I've always felt the best way to get around this was to simplify the product; make SharePoint easier to understand and not this big blue monster.
A big piece of this is understanding how the file system works in SharePoint sites. Armed with this knowledge, it makes it much easier to understand errors and issues you may run into with your custom components. To this effect, I recently saw an article published on MSDN that explains the concept of customized and uncustomized files which also covers the virtualized SharePoint file system:
» Understanding and Creating Customized and Uncustomized Files in Windows SharePoint Services 3.0
I hope everyone finds this post valuable.
Subscribe to:
Comments (Atom)


