One of the most frustrating things about designing for the Web is the wide array of browsers and screen formats in which your site may be displayed. SharePoint Designer helps mitigate this problem by giving you several preview options.
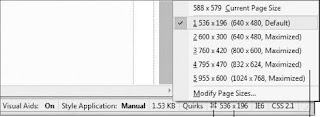
First, you can fix the Design view to a set of dimensions. In the status bar, you can see the current dimensions of the window the Design view represents. Click the dimensions entry to see the menu shown in Figure 1-11, which allows you to choose from several page sizes.
First, you can fix the Design view to a set of dimensions. In the status bar, you can see the current dimensions of the window the Design view represents. Click the dimensions entry to see the menu shown in Figure 1-11, which allows you to choose from several page sizes.

Figure 1-11
If the selected dimensions are smaller than the current design window, the width of the working area is reduced to the horizontal dimension selected. The chosen vertical dimension is shown by a dotted line across the visible area of the page.
If the selected dimensions are larger than the current design window, the workspace is expanded horizontally, and the scroll bar at the bottom of the window is activated.
Note: The default page sizes represent Microsoft Internet Explorer in its default configuration. You can create your own set of dimensions to choose from.
When a fixed page size is selected, the dimension status shows the hash symbol seen in Figure 1-11. The Page Size menu is also available under the View menu.
Design view provides a close approximation of the rendering of your page, especially with the visual aids turned off. However, even with the fixed page size option, SharePoint Designer cannot perfectly reproduce the environment of a web browser. To resolve this, SharePoint Designer provides the option to preview your page directly in web browsers.
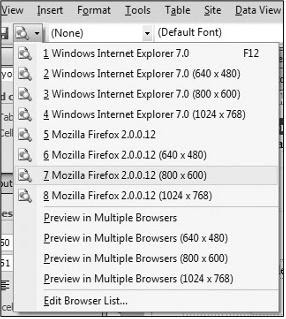
Not only can a page be rendered differently in a browser than within SharePoint Designer, but different browsers and even different versions of the same browser have their own ways of rendering pages. It is best practice, therefore, to test your pages in each of the browsers you expect to view your site. SharePoint Designer’s Preview in Browser function enables you to select an exact environment in which to test your pages. Figure 1-12 shows the Preview in Browser menu as selected from the icon in the Common toolbar.

Figure 1-12
Internet Explorer and Mozilla Firefox are automatically detected by SharePoint Designer if they are installed on your workstation. In addition, you can select any other installed browser for live preview. Follow these steps to add another browser to the preview list:
1. Select Preview in Browser@@>Edit Browser List. The Edit Browser List dialog box appears, as shown in Figure 1-13.

Figure 1-13
2. Click the Add button. The Add Browser dialog box appears (see Figure 1-14).
Figure 1-14
3. Type a name to represent the browser.
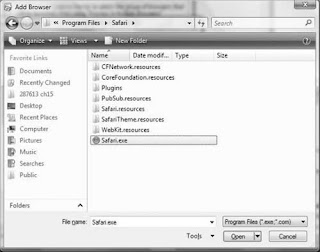
4. Click the Browse button to open the Add Browser window (see Figure 1-15), and navigate to the .exe file that starts the application. (You may need to look at the properties of the application’s launch icon to find the file location.)
3. Type a name to represent the browser.
4. Click the Browse button to open the Add Browser window (see Figure 1-15), and navigate to the .exe file that starts the application. (You may need to look at the properties of the application’s launch icon to find the file location.)
Figure 1-15
5. Click Open, and then click OK on the other two dialogs.
5. Click Open, and then click OK on the other two dialogs.


No comments:
Post a Comment